How do I design a new continent for my world, Terrenden?
(I still have a couple of undisclosed continents, but I'm getting closer to putting the whole world together - something I really need to finish!)
The story here is that I'd had a design for my continent of Alacantis before, but I decided I didn't like it and wanted to start off with something totally new. So, I thought that it was a good excuse to take you along with me and see how I design something new from something totally old.
First, I browsed through various island maps on Image Search on Google. I put a whole bunch of images into my "maybe" file, but here's the one I decided to play with.
Cortes Island - and the islands around it. This is sandwiched between Vancouver Island and the mainland of British Columbia. I thought it was an interesting little group of islands - and something I've never really used in my stories. So, this was the winner.
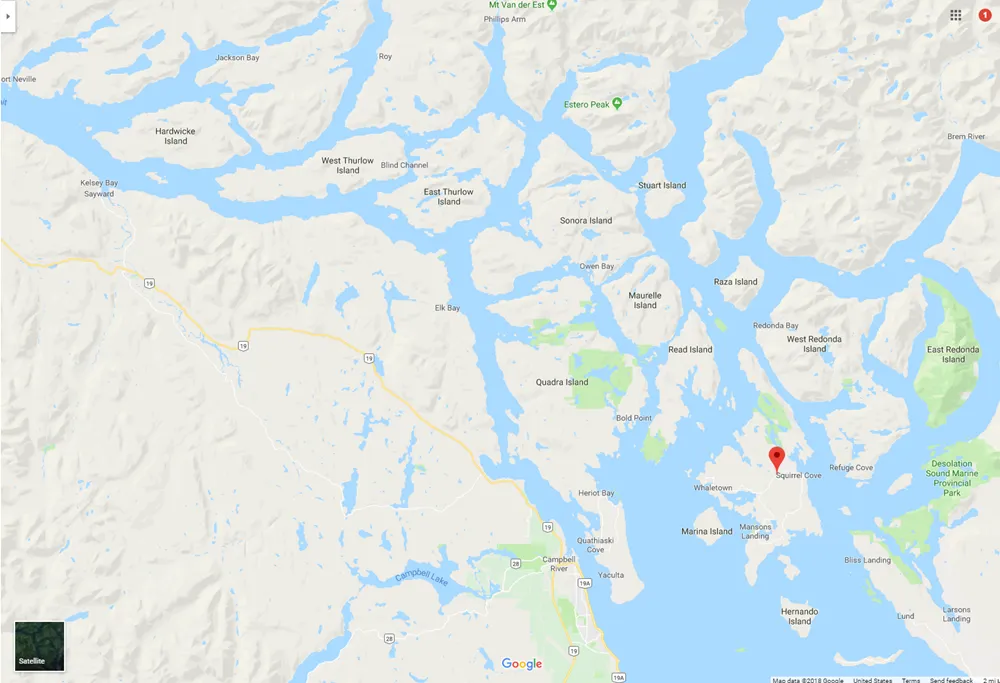
(map from Google maps - used for educational and creative purposes)
Step-by-step worldbuilding
ONE. Preparing my canvas. Define edges
- "Add alpha channel" (right click on the layer in the layer dialogue.)
- Then I look at those funny little peninsulas and work out which ones would be part of my land and which ones would not... I took my GIMP paintbrush and ran along where I wanted to break it off.
- Next, I take my magic wand tool (fuzzy select) and select bits to delete so that I'm left with my islands plus some sea around it.
- I decide my orientation. I normally flip and rotate a fair amount until my land has only a passing resemblance to the original.
TWO. Define land and sea (sounding like Genesis here...)
- I use my color select tool to select the blue. Then, I invert the selection so that the land is featured. (Or everything that's not part of the blue section anyway.) Then, I delete (and bucket fill the same area with a green - one of the options in the bucket fill tool box allows me to fill everything in the selection at once.)
- Everything else gets filled with a blue.
- I had to play with the eraser tool a bit to get rid of letters, etc, that extended over the water. (I might have done this in the next step...)
- Now, I duplicate the layer, by right-clicking over in the layer dialogue.
- In my "water" layer (lowest layer), I color select the land and delete it.
- In my "land" layer, I color select the water and delete it.
- This is about where it's good to use a texture for your water and land if you want. I also ended up making shallower water around the islands - that was partly accidental because of some of the lettering that was difficult for me to get rid of from the original map.
THREE. Add some 3D effects
- in the filters menu, there's a "decor" selection. I choose "bevel" and select about 9 or 10 for the number. I want to work on my actual map rather than a copy, so I select accordingly.
- I add two new layers above my land layer - one with the "multiply" mode applied to the layer (to darken) and one with the "overlay" mode (to lighten).
- With opacity (on my paintbrush) set to about 20%, I brushed a black shadow around the bottom and right edges to each island. (On my multiple/dark layer.)
- I come back to the overlay layer and brushed another 20% stripe around the top and left edges to each island.
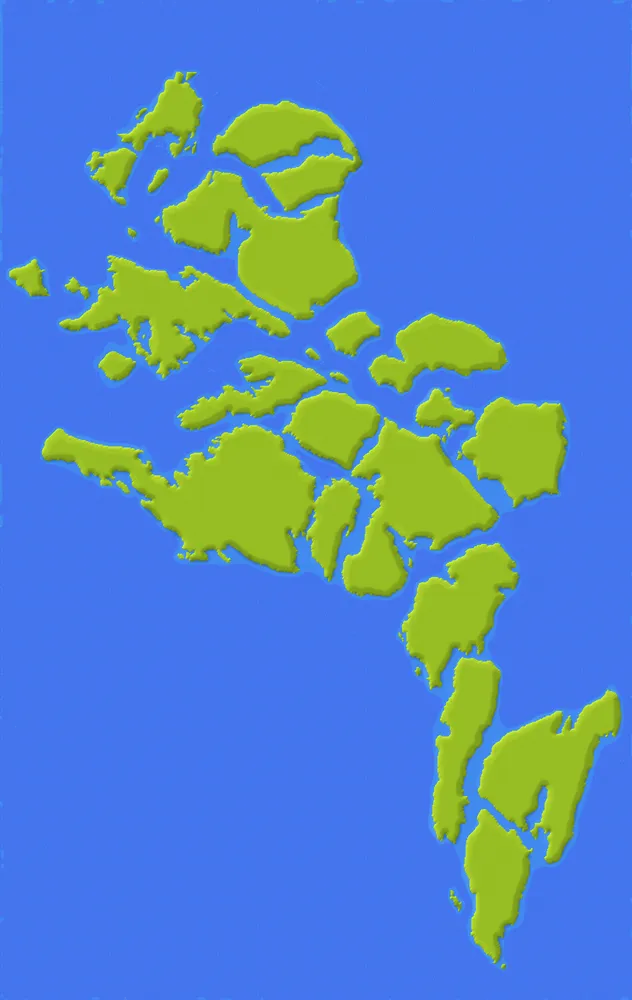
This is what I have up to this point. Honestly, this is the most tedious part of the project. It gets faster from here!
(This post is crossposted at Steemit, Whaleshares and WeKu.)

Lori Svensen
author/designer at A'mara Books
photographer/graphic artist for Viking Visual
now also on: Whaleshares and WeKu

Banner by @shai-hulud