It's the holiday season and I transformed in the spirit of it.
I decided to make a little icon of my character as a different species for the holidays. And you're going to see how I drew this icon up below as I'm going to do another tutorial for you guys. :)
⚜ ⚜ ⚜ ⚜ ⚜ ⚜ ⚜ ⚜ ⚜ ⚜ ⚜ ⚜ ⚜ ⚜ ⚜ ⚜ ⚜ ⚜ ⚜ ⚜ ⚜ ⚜ ⚜ ⚜ ⚜ ⚜ ⚜ ⚜ ⚜ ⚜
Drawing Details
| ART CATEGORY | DETAIL |
|---|---|
| Art Medium | Digital: Krita |
| Art Tool | Wacom Cintiq 13 HD |
| Art Style | Semi-Realistic |
| Level of Detail | Full Detail - Smooth Shaded |
| Background Detail | Simple |
| Size | Icon/Headshot |
| Dimensions | Portrait: 2048 x 2048 |
| Date Completed | 2018-11-30 |
My Layer Layout
- Border
- Foreground
- Breath [Opacity 50%]
- Lineart layer
- Highlight layer
- (Copied Backlight layer)
- Backlight layer
- Shading layer [Opacity 85%]
- Folder for Character Colors (Folder will be masked to Base Color.)
- Base/Primary Color layer
- Stars
- Sketches
- Extra Sketch layer
- Fine Sketch layer
- Rough Sketch layer
- Canvas Background layer (neutral color like grey)
Canvas Prep/Rough Sketch
I start off with a neutral colored canvas like grey. Then in my rough sketch layer, I just sketch out the basic shapes and the pose.

Fine Sketch
After I got my rough sketch down, I sketch over it with a finer sketch in the fine sketch layer.

Lineart
Once the sketch is completed, I simply just trace over the sketch with a lineart in the foreground folder lineart layer.

Base Color/Primary Color
With the contiguous (wizard) selection tool, select all the areas outside the character's parameters then invert the selection. Then inside the foreground folder in the character's color folder, fill in the selection with a neutral color or in this case, the character's primary color. As always, you do this process like this that way you do not have as many gaps in your base color compared to just selecting areas inside parameters plus it is much quicker than selecting each and every patch of space inside the character.

Detail Colors
Here I add in the rest of the colors, utilizing all my color layers for easy editing.

Shading
Then comes the shading! First, I turn off the color layers temporarily to be able to work with the shadows easier. I draw in the shades using black color in the shading layer. Then I smoothed out the edges of all the shadows. This layer will be at 85% opacity and in Krita, I would make this layer "grain merge" for its blending mode.

Highlights
In the highlight layer with a white color, draw in the highlights then blur the lines.

Backlights
Do the same for the backlights in the backlight layer. Then for this in Krita, I made the layer "soft light" for its blending mode. For me, to make the backlights stand out more, I just copy the backlight layer so there will be another one above with the same settings. These layers are transparent a little because of the layers' blending modes.

Then, turn on the color layers.

Background
Here, I just add a gradient background. Tip: You can use the canvas background layer to do this on.

I added some stars in its own layer using a brush preset pattern.

Misc. Details/Final Check/Final Result
I simply add in some breath for him since it is winter time. ;)
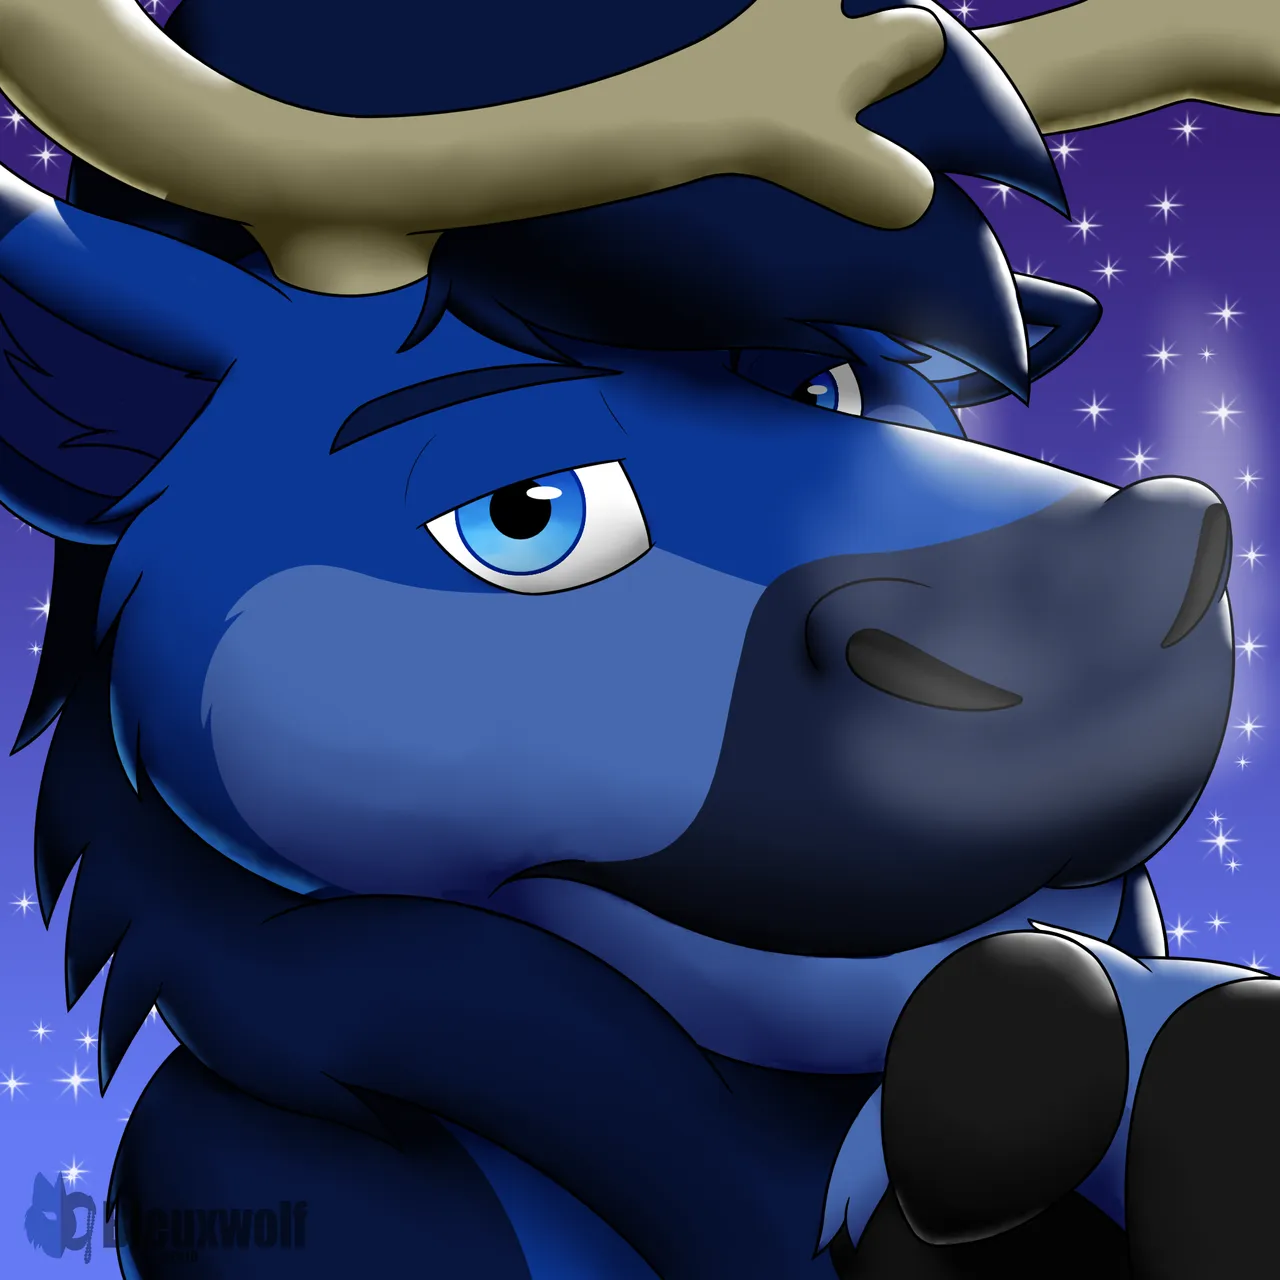
For here finally, I just have a separate layer over the foreground and added a white border and turn the opacity down to 35.
And that's that!
Animation of Step-by-Step Progress

I hope you enjoy the pic and hope the tutorial helps!
Character and artwork by @bleuxwolf
⚜ ⚜ ⚜ ⚜ ⚜ ⚜ ⚜ ⚜ ⚜ ⚜ ⚜ ⚜ ⚜ ⚜ ⚜ ⚜ ⚜ ⚜ ⚜ ⚜ ⚜ ⚜ ⚜ ⚜ ⚜ ⚜ ⚜ ⚜ ⚜ ⚜

⚜ ⚜ ⚜ ⚜ ⚜ ⚜ ⚜ ⚜ ⚜ ⚜ ⚜ ⚜ ⚜ ⚜ ⚜ ⚜ ⚜ ⚜ ⚜ ⚜ ⚜ ⚜ ⚜ ⚜ ⚜ ⚜ ⚜ ⚜ ⚜ ⚜