
Hello everyone! Welcome back for more art ♡ Today I will show you step by step how to draw a birdie. ^^
I would love to see your results in the comments or link to your post! If you have any questions or get stuck please let me know. Your feedback will help me greatly in improving my future tutorials. Feel free to also leave any tutorial requests for the next time.
I'm working on another long post (hint: wings), meanwhile I hope you enjoy this small tutorial!
All of the drawing in this post were made by me, @kristyglas.
Contest Update: Thank you @enternamehere for adding 10 SBD to the reward pool!!!
These rewards will be divided between 3 winners: 5 SBD- 3 SBD- 2 SBD!
- Winner 5 SBD (+ 1SBD from me and liquid SBD from second post)
- Winner 3 SBD
- WInner 2 SBD
@enternamehere is a very creative artist (with very calming posts) that I highly recommend to check out!
More about the contest is below after the tutorial and here.
Our Reference Today:

I've been practicing drawing wings, so I chose a flying bird for this tutorial. I picked something small and cute for us to have more fun.
Important: don't draw from memory while doing a photo study! It's easy to forget to look at the reference and miss very important details. Drawing from memory is a different exercise from this one.
First Steps

First of all, it's important to position your drawing well. You want to have enough space for the whole bird as otherwise the drawing will look weird or you'll need to start again.
To avoid this problem you first mark circles for the body and the approximate length of the wing. This way, you can easily erase and try again.
Next use circles and half circles to mark the span of the wing. There are two important half circles on the wing, and I actually positioned them where the 2 main bones of the wing are. Imagine like a human hand-elbow & elbow-shoulder.
If you have trouble with size relations, you can use a relative sizes like "heads" for comparison. How many bird heads is it's body in this reference? (1 & 1/2 heads)
Details

Now you can mark each feather. You don't have to count them, rather see how how each feather is similar width and look at their approximate angle. I drew them from right to left, because the next feather overlaps the previous one.
The reason why I think construction lines and circles are great is because you can redraw same thing over and over and still get easily very similar results. By simplifying things you can more easily concentrate on correct proportions.
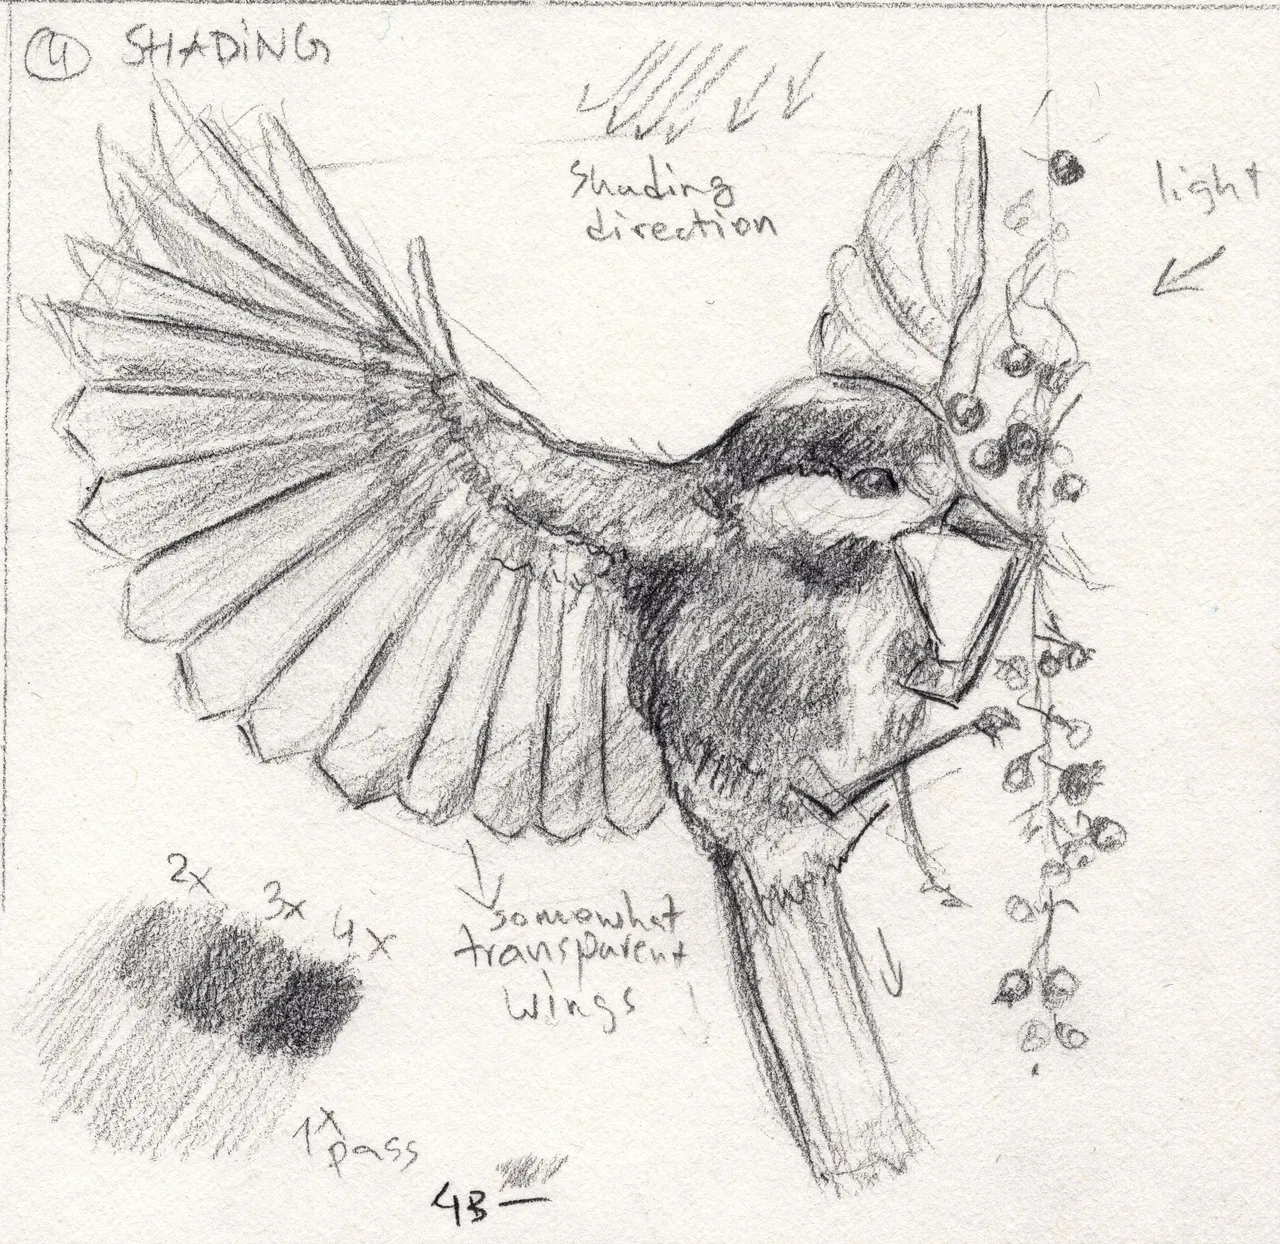
The next step is shading, but if you plan to use pens then skip this step. For sharing you have to determine where the light is coming from. Next you do a soft pass over all the dark areas in one direction.
I used a 4B pencil because it can easy achieve soft and hard shading. To get darker areas simply keep doing more passes in the same direction over the previous one. This way you avoid overdoing it and can easily make it darker.
Finally I sharpened the pencil and added some sharp lines defining the contours of the bird and feathers, making it stand out more.
Do not smudge when shading! Smudging usually make the drawing less recognizable and much harder to control.
Optional-Inking

For inking I used 0.1, 0.4 inkpens and some alcohol based markers for shading. If you can get only 1 pen then I suggest 0.2 inkpen, because you can get thin lines and dark lines with more passes.
Start with a thin outline of the bird and details, after which you can softly erase the pencil sketch.

Next use the thicken pen over the lines in the shadows, to make the bird more voluptuous. This way when you start shading you don't get a flat look. I suggest to shade only in one direction while learning, as it's easier and cleaner. Shade in the same direction as the light for a more natural look.
I use the promarkers to get a more dimensional look, if you can I highly suggest you buy just one to try it out in your drawings. Because if you shade just with pens, it's hard to shade very light areas. However, it is possible: use thin and more spaced out lines.
Whole Tutorial

You can download this for later reference or if you wish to share it easier.

Extras

These are some of my older bird studies from 2017. I noticed that I never really drew wing studies, especially flying birds. This is probably because I had no idea how it worked, but I've learned a lot this week and looking forward to sharing with you in the next post, which will be ready in a couple of days.

Yesterday I bought a new sketchpad specifically for watercolors. I've see many beautiful paintings lately and really wish to learn those techniques. And it will be more fun painting dragons!

This week I've been playing "I love Hue". A free phone game, per my brother's recommendation. The challenge is to order the hues back into their right order matching the gradations.

And lastly, I finally started reading a bit more. I'm currently reading an interesting book I bought on second hand market, a while ago. The illustrations are adorable and stories interesting; however, the English is somewhat weird.
Thank you for reading! I look forward to seeing your drawings! ♡
I will reward 1 randomly to 1 person who enters after payout of the second post. I'm prolonging contest a little to give more people a chance to enter. You can post for your family or friend just let us know they drew it :)
If you make a post with your results, I will resteem (up to 15 posts) & upvote all, just don't forget to leave me a link below! :D
For every 15 entries I'll add 0.5 SBD consolation prize for another random picked entry, up to 5 SBD.
If you'd like more tutorials in the near future, please considering sharing this with friends!
Also you can check out my last old Drawing Toads Tutorial!
