Hi Fellow Steemians and DIY enthusiasts,
This next post is dedicated to the finish work for the bathroom project I started months ago. It's important to get a plan of action when tackling any DIY project. For me it was a little daunting because we were replacing so many floors that it was hard to come up with a plan to really get things rolling. I was able to get the flooring placed and it looking nice except that I didn't really have a plan set in place for how I would finish the trim. My work was haphazardly spread around between the various projects but is now a bit more organized and approaching completion.
Tools for the job!
It's difficult to do these types of jobs without the right tools to do so. As with any job, particularly construction types, the most important tool to have is the proper safety measures. There isn't a whole lot of sense to do anything without properly protecting yourself.

The next tool that is required for this project is a tape measure and pencil to measure and mark off the locations where you are going to be making your cuts.

A possible necessity for some jobs is an angle finder for the situations where what you are dealing with is not necessarily even 90 degree cuts. I have to deal with that in another upcoming job and will elaborate on it then, but for this job I did not need it.
To adhere the trim to both the floor and other surfaces like the tub and cabinet I used a good clear silicone in a caulking gun.


Since the area won't be receiving a lot of bumps and movement this silicone will work just fine. If a high traffic area that does receive those things is the spot then a stronger option would be ideal.
You should also have a rag to clean up any mess you make, a microfiber rag is always a good option.

To ensure that what you are doing is going to have a clean, no mess look you will also need some form of tape. I recommend blue painters tape since it doesn't leave residue and is pretty resistant to seeping.

Finally, the last set of tools are a good bench saw, equipped with a high quality blade installed for nice smooth cuts, and an extension cord. The red Diablo brand blades are of excellent quality and I've been using them for years.

Trim information
The trim portion of any type of housing project is an important one as it gives you closure to the project. Working with my dad who is an electrician, the trim portion of the job was always satisfying because that meant that the project was wrapping up and you could put the finishing touches on it. For the flooring, as with any trim project really, it also allows you to hide any imperfections that exist in your work. DIY projects are a big learning curve whether or not you are a beginner or an expert; there are always going to be things you are going to learn. Knowing this and being open to learning is important! We don't know everything so whatever we learn is good for the next project we undertake. The word trim is just a category assigned to the pieces of material that you use to cover up things and make it look better and hopefully more professional. In this case, the trim is called "overboard." I chose a vinyl trim because it's impervious to water due to its plastic vinyl coating which is ideal for a bathroom.
I learned the hard way that the vinyl coated flooring is the way to go for a bathroom project. The first flooring I put down was just traditional wood laminate flooring and it warped after it was all complete. Pulling all of those boards up was not a fun endeavor!
One thing that I wasn't keenly aware of was the trim was shaped differently on two sides but it really helps when they do that. It allows you to install it in multiple different locations and configurations depending on your desires.

As you can see, the trim has a narrow edge and a wide edge. The narrow edge helps in situations where you don't need to hide much but still want to have the look of the trim. I chose the wide edge for mine because this flooring project was my first attempt at a flooring remodel so I wasn't entirely sure what to do and had some mistakes in cutting. I have since gotten much better at doing it! It also helps to have the proper tools for the job. Also make note of the internal structure of the board. It is particle board at its core so if there is water possibly getting behind it, you need to ensure to seal it from any side.

Putting down the trim
Once you get your tools situated it's time to start making some measurements. You are just measuring from one end to another of where the trim will be sitting. For example, I need to put the trim the length of the tub so I measure from one end of the tub to the other.
Once you have your measurements and cut the trim to length, it's time to cut the angles. This part of the job requires the table chop saw since it is stationary and has the ability to swivel in a 90 degree arc. Other saws are sufficient but you are more likely to mess up the cut and that just makes the job worse!
It's important to put your trim, with the correct side facing down, on the floor to figure out which angle you are going to be using. The best laid plans can be fooled by an improper calculation. The job I was doing had both inward and outward facing 45 degree angles so I had to really pay attention to what I was doing.

Once you figure out which direction you are going to cut the angle, inward or outward, you move the saw in the corresponding direction.

Gluing it all down!
Once you have the angles for the trim cut according to the requirements for the spaces, now's time to glue it down and seal it up!
Using the silicone on the floor is a bit easier than against the tub because you don't have much to worry about so we will start there. With the tube in the caulking gun, run a line (they call it a bead) about the same thickness as the tip of the tube along the floor in the direction you want to go. Once that is accomplished, put the trim in its place and place some weight against it so it won't move out of place.
The tub is a different story. With the tub, you are going to use the blue painters tape that I recommended having on hand because you want to make sure the silicone doesn't bleed out and be highly noticeable.

As you can see in the above image, I put the painters tape along the edge of the trim and made a thin edge along the tub so that it will adhere to the tub as well as the trim. This allows any excess water to just roll right off the trim. If you didn't do this, it would seep behind the trim and ruin the particle board internal structure of the trim that isn't covered by the plastic vinyl.
Once you tape the trim and side of the tub down you can start to put some silicone on. Doing so in a thin smooth line will make it so you don't have excess silicone bleeding out everywhere.
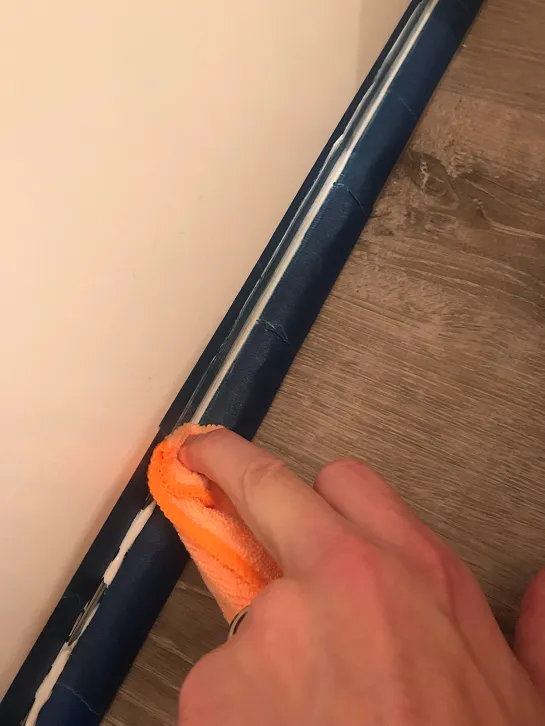
Once you run a bead along the whole tub then use the rag as seen above to press in the silicone into the thin gap between the trim and the tub. This ensures a nice quality seal to prevent water damage. Once that's accomplished its time to put some weights on the floor to keep the trim in place until it dries, which takes 24-48 hours depending on the temperature and humidity.

The final component for me was sealing the toilet. If the toilet isn't sealed then it kind of floats on the floor a bit and is just a real pain because you don't want the wax seal to break and get toilet water everywhere! Just like the tub, you want to put the blue painters tape all around it to prevent bleeding onto the floor. Once you have the tape put all around the toilet, you can start to apply some silicone in a thin bead similar to the tub. 
From there you want to make sure to press the silicone into the crevices under the toilet so that it seals it and prevents motion.

You can see once you press the silicone into the lower edges of the toilet, it pushes it underneath and creates a nice thin seal that will become clear once it dries and you won't be able to notice it.

Ending thoughts
I enjoyed this project since it gives me closure on the flooring aspect of our bathroom. We are still going to replace the mirror, light fixture and door trim but those are projects for another day. The trim part of the job is one that helps you think of something as completed so it's certainly a good one! I would love if you shared your thoughts or some DIY project feedback of your own in the comments! We all learn when we collaborate so hopefully these posts will motivate some people to start some DIY projects of their own.
Check out my other DIY project posts:
Laminate floors in a bathroom
Ball joints on a car
Did you enjoy this post or my other posts? Please consider following me for more! @cmplxty
Do you want to get paid, in crypto, for searching the internet? Try using and signing up for Presearch to earn some great crypto! I've currently got 125 PRE tokens, with a market value of $7. It doesn't sound like a lot but when you search using sites like Google you get paid $0! Join Presearch to break Google's stranglehold on the internet searches. If you'd like to sign up, use my referral link below and spread the word!
https://www.presearch.org/signup?rid=513043