English version
A little while ago I shared with you two of my sculptures that are part of an art project I called "The Terminal Assemble". The first one I made was an Iron Kitty figure, representing @thekittygirl , then I made one I called Hawk Wes, representing @wesphilbin .
You can see the two figures by following these links:
Iron Kitty:
@gaboamc2393/iron-kitty-sculpture-escultura-de-iron-kitty-engesp
Hawk Wes:
@gaboamc2393/hawk-wes-sculpture-eng-esp
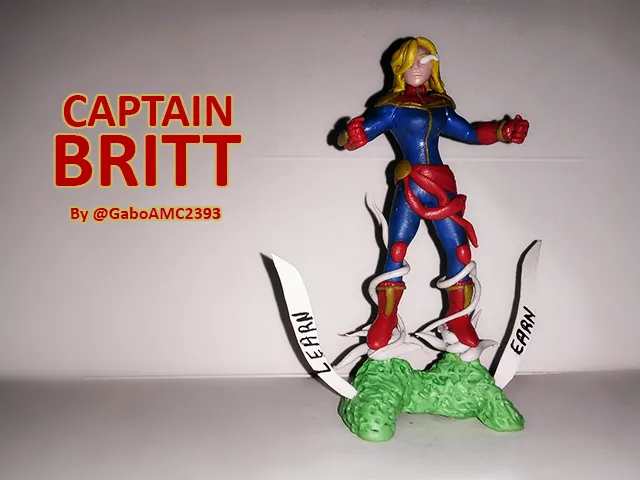
Now it's someone else's turn, from the esteemed @brittandjosie , administrator of TheTerminal community. This would be the third of six figures, so we're halfway to completing the entire collection of The Terminal. Without further ado, I present to you Captain Britt.
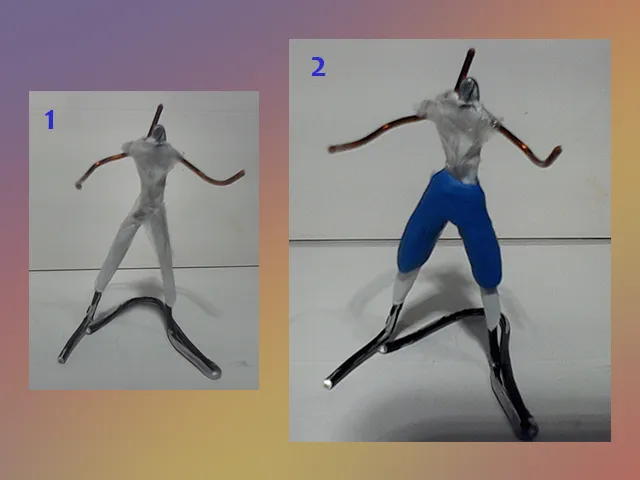
For this figure I made a wire skeleton, covered it with paper and then with tape (1). I didn't use too much paper, as the figure is thin and I couldn't give it too much padding.
Once I finished the skeleton, I started to cover the skeleton with blue plasticine. I started with the legs (2).
I began to stretch the plasticine along the legs and waist, molding the plasticine to give it a feminine shape, with the corresponding curves. Below you can see pictures from different angles.
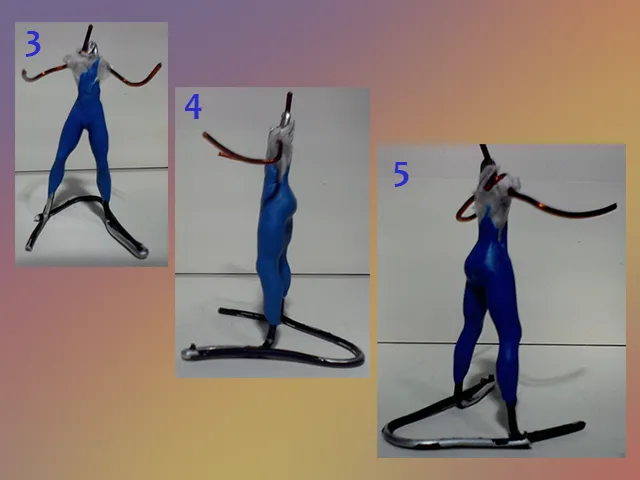
Once the legs were finished, I began to cover the torso of the figure (6). Then I molded the breasts (7) and finally the back (8).
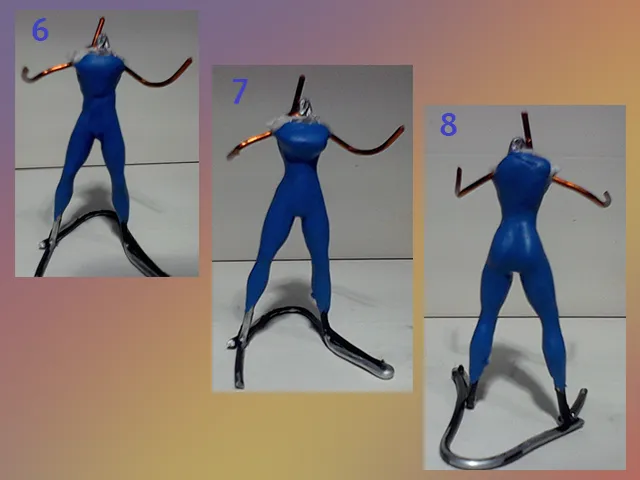
The next step was the arms, for them I simply covered the wire with plasticine (9) and molded it with the help of a needle to obtain the desired result (10). I also used the needle to make lines on the neck of the figure, lines that will later serve to know where to cut to remove the blue plasticine.
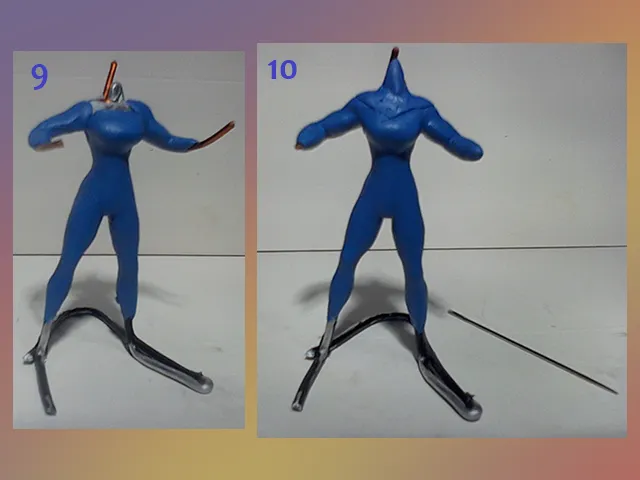
As you can see in the image below, I molded the arms to give musculature to the captain (11 and 12). With the lines defined on the neck of the figure, I began to cut to remove all the blue plasticine (13).

The intention of removing this blue plasticine from the neck is to cover it with red plasticine (14). With the help of toothpicks and a knitting needle, I began to mold the red plasticine around the wire skeleton (15). Once this was done, I made small lines of yellow plasticine and placed it around the neck as an ornament of the figure (16).
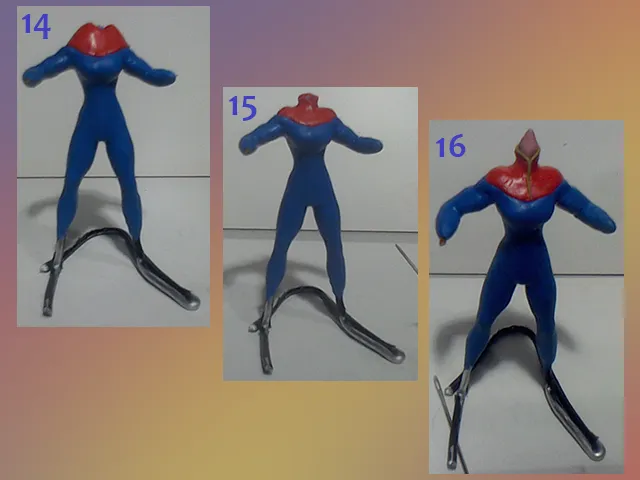
I placed more yellow ornaments right where the red and blue plasticine meets (17). I made more yellow lines and placed them along the torso of the figure (18). Finally, I placed a triangle of red plasticine around the waist to simulate a scarf (19).
The last thing to do is the boots and gloves. First I made the right boot (20) and then the left boot (21).
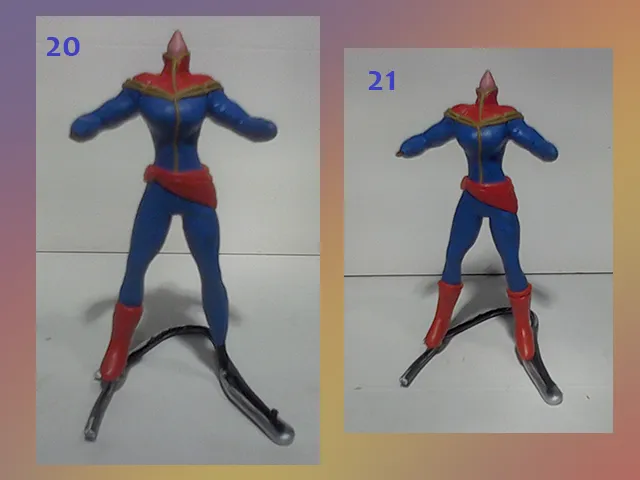
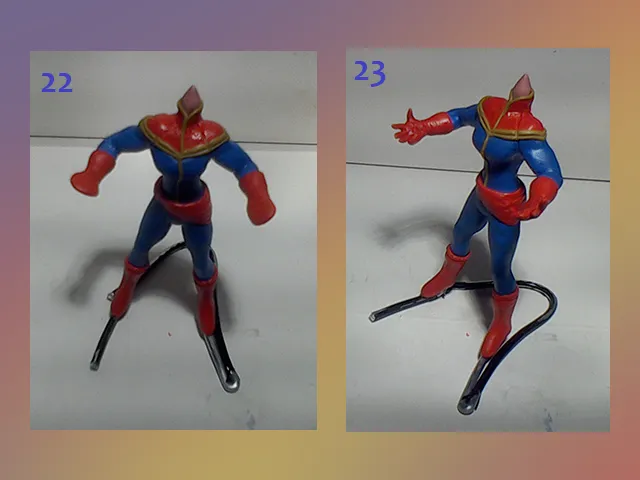
The next step was to make the gloves (22) and then the hands with all their fingers (23).
At this point, I must comment that I dropped the figure and had to repair it. I didn't have to remake it, but I did have to adjust some parts. In this process, I took the opportunity to make some modifications to the original design and add some new things.
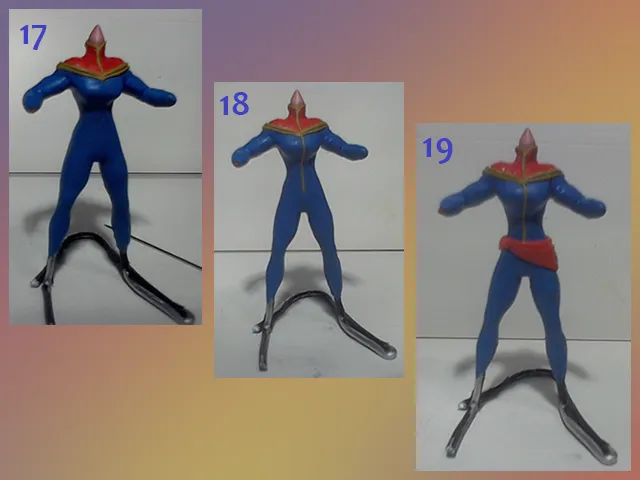
I added golden shoulder pads and red knee pads, plus a golden buckle on her belt, as seen in the image below (24).
The hands were also damaged so I had to make them again (25). I also added golden bracelets and golden details on the forearms (26).

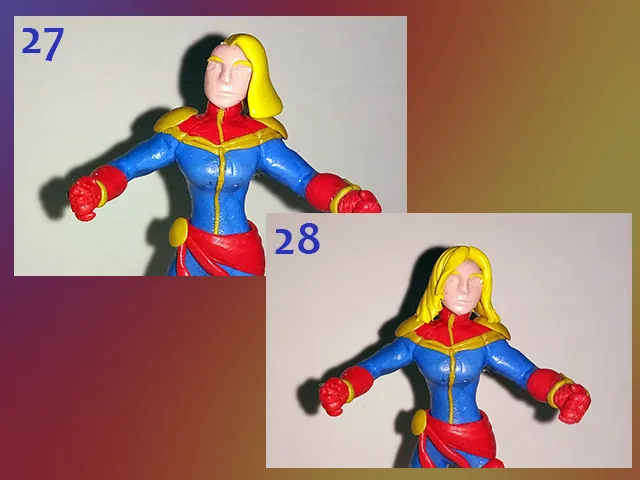
Next was to make the face. I had planned to make it with just a helmet, but then Miss Britt would not be recognizable, so I tried to make a face that looked like her, despite the size of the figure. Once this was done, I began to shape the hair (27). With the help of a needle I made lines in the hair and finished shaping the rest of the blonde mane (28).
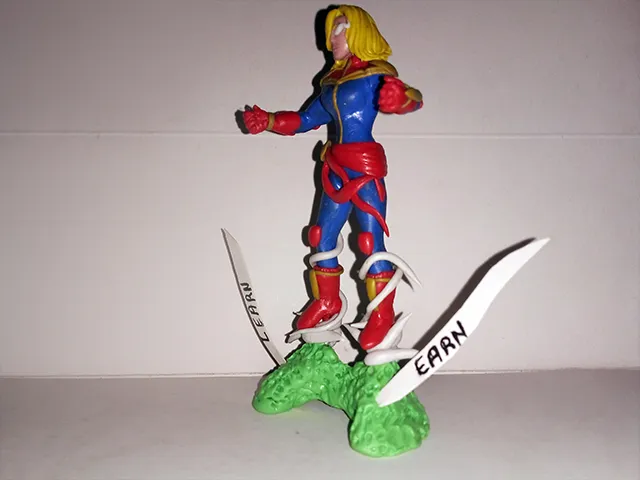
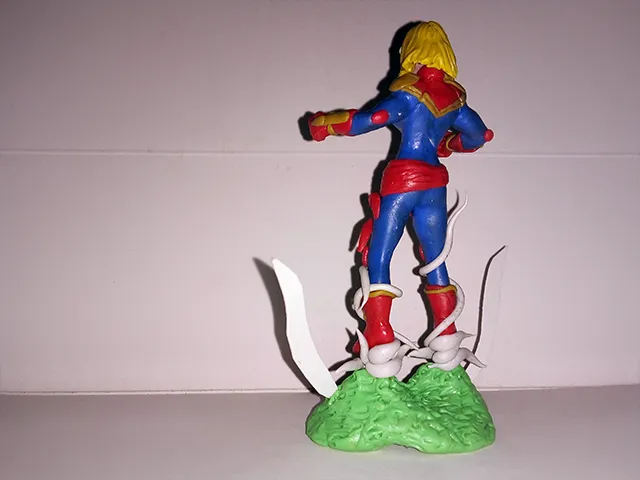
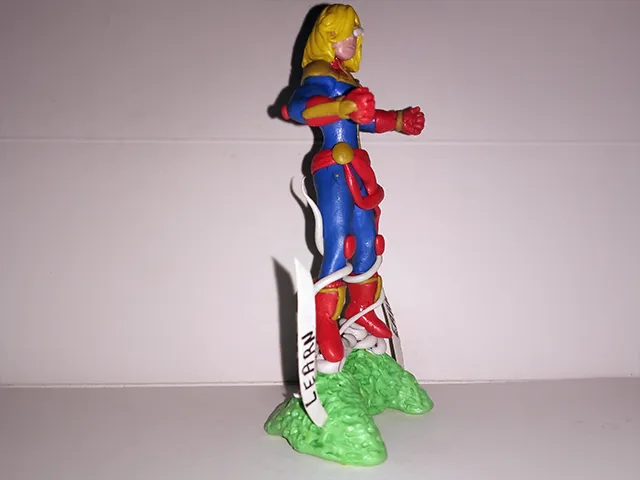
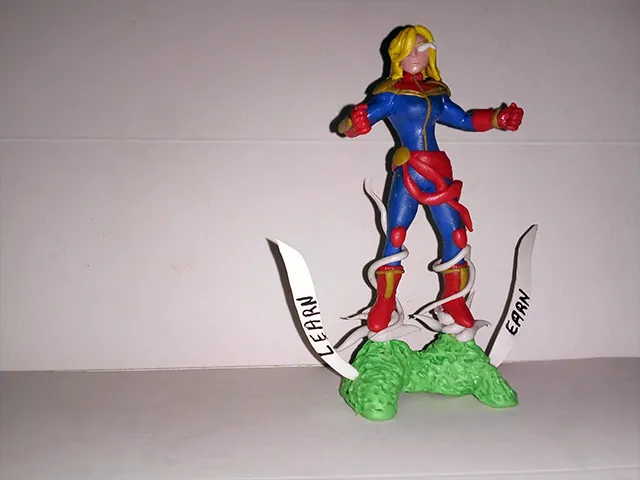
In this way the figure was finished, to which I added a green base and a few white lines that represent his energy, which also comes out of his eyes.
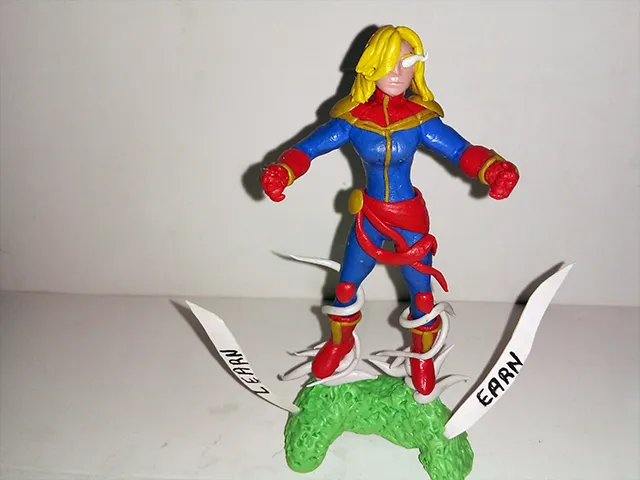
As you can see, on the base it says "Learn Earn", in reference to the Learnandearn contest that Miss Britt was running for a long time. A very interesting contest where you can win a few HIVE for simply sharing what you have learned. I thought it was interesting to reference it, I'm sure she will understand. Greetings Miss Britt, if you happen to be reading me hehe.
Having said all this, and after all the process already mentioned, the figure was completely finished. I leave you a series of pictures taken from different angles.
Well friends, I hope you liked the figure I made. As I mentioned at the beginning, it is part of a much larger sculpture that will be formed by six figures, so if you want to see the final work, you must be attentive not to miss any figure.
If you like to leave your opinions about the figure, you can do it in the comments, I will be happy to read them. With nothing more to add, I will say goodbye then...
See you next time!
Versión en español
Hace poco tiempo compartí con ustedes dos de mis esculturas que forman parte de un proyecto artístico que llamé "The Terminal Assemble". La primera que hice fue una figura de Iron Kitty, en representación de @thekittygirl , luego hice una que llamé Hawk Wes, en representación a @wesphilbin .
Puedes ver las dos figuras siguiendo estos enlaces:
Iron Kitty:
@gaboamc2393/iron-kitty-sculpture-escultura-de-iron-kitty-engesp
Hawk Wes:
@gaboamc2393/hawk-wes-sculpture-eng-esp
Ahora es turno de alguien más, de la apreciada @brittandjosie , administradora de la comunidad TheTerminal. Esta sería la tercera de seis figuras, así que vamos a medio camino de completar toda la colección de The Terminal. Sin más que agregar, les presento a la Capitana Britt.
Para esta figura hice un esqueleto de alambre, lo cubrí con papel y luego con cinta adhesiva (1). No usé demasiado papel, ya que la figura es delgada y no podía darle demasiado relleno.
Una vez terminé el esqueleto, comencé a cubrir el esqueleto con plastilina azul. Comencé con las piernas (2).
Comencé a estirar la plastilina a lo largo de las piernas y la cintura, moldeando la plastilina para darle forma femenina, con las curvas correspondientes. Abajo pueden observar fotografías desde distintos ángulos.
Una vez terminadas las piernas, comencé a cubrir el torso de la figura (6). Luego moldee los pechos (7) y por último la espalda (8).
El siguiente paso fueron los brazos, para ellos simplemente cubrí el alambre con plastilina (9) y lo moldee ayudándome de una aguja para obtener el resultado deseado (10). También usé la aguja para hacer líneas en el cuello de la figura, líneas que luego servirán para saber donde cortar para retirar la plastilina azul.
Como pueden observar en la imagen a continuación, moldeé los brazos para darle musculatura a la capitana (11 Y 12). Con las líneas definidas en el cuello de la figura, comencé a cortar para retirar toda la plastilina azul (13).
La intención de retirar esta plastilina azul del cuello, es para cubrirlo con plastilina roja (14). Con ayuda de palillos y una guja de tejer, comencé a moldear la plastilina roja alrededor del esqueleto de alambre (15). Una vez hecho esto, hice pequeñas líneas de plastilina amarilla y la coloqué alrededor del cuello como un adorno de la figura (16).
Coloqué más adornos amarillos justo donde se une la plastilina roja y la azul (17). Hice más lineas amarillas y la coloqué a lo largo del torso de la figura (18). Por último, coloqué un triángulo de plastilina roja alrededor de la cintura para simular un pañuelo (19).
Lo último por hacer son las botas y los guantes. Primero hice la bota derecha (20) y luego la izquierda (21).
El siguiente paso fue hacer los guantes (22) y luego las manos con todos sus dedos (23).
Llegado a este punto, debo comentar que se me cayó la figura y tuve que repararla. No tuve que hacerla de nuevo, pero sí tuve que acomodarle algunas partes. En este proceso, aproveché de hacer algunas modificaciones al diseño original y agregar unas cosas nuevas.
Agregué hombreras doradas y rodilleras rojas, además de una hebilla dorada en su cinturón, tal como se observa en la imagen de abajo (24).
Las manos también se le dañaron así que tuve que hacerlas de nuevo (25). También agregué brazaletes dorados y detalles de este color en los antebrazos (26)
Lo siguiente fue hacer la cara. Tenía planeado hacerla solo con un casco, pero así no se reconocería a la señorita Britt, así que traté de hacer un rostro que se pareciera a ella, a pesar del tamaño de la figura. Una vez hecho esto, comencé a moldear el cabello (27). Con ayuda de una aguja hice líneas en el cabello y terminé de moldear el resto de la melena rubia (28).
De esta manera quedó terminada la figura, a la cual le agregué una base verde y unas cuantas líneas blancas que representan su energía, la cual también sale de sus ojos.
Como pueden ver, en la base dice "Learn Earn", en referencia al concurso Learnandearn que la señorita Britt estuvo realizando durante mucho tiempo. Un concurso muy interesante en el que puedes ganar unos cuantos HIVE por simplemente compartir lo que has aprendido. Me pareció interesante hacer referencia a ello, seguro que ella lo entenderá. Saludos Señorita Britt, si acaso me estás leyendo jeje.
Dicho todo esto, y tras todo el proceso ya mencionado, la figura quedó completamente terminada. Les dejo una serie de fotografías capturadas desde distintos ángulos.
Bien amigos, espero que la figura que hice les haya gustado. Como mencioné al comienzo, es parte de una escultura mucho más grande que estará formada por seis figuras, así que si desean ver el trabajo final, deben estar atentos para no perderse ninguna figura.
Si gustan dejar sus opiniones sobre la figura, pueden hacerlo en los comentarios, yo estaré encantado de leerlos. Sin más que agregar, me despido entonces...
¡Hasta la próxima!

Imagenes editadas con Photoshop
Traducido con DeepL
Photos edited with Photoshop
Translated with DeepL
Últimos tres post/Last three posts:
Negro como el café
Gabo Play Megaman x4 #2
Drawing #2: Little Panda