
Hola amigos de Hive! nuevamente les doy la bienvenida a una nueva presentación de la semana!😊👋❤️💕
Hello Hive friends! Once again I welcome you to a new presentation of the week!😊👋❤️💕


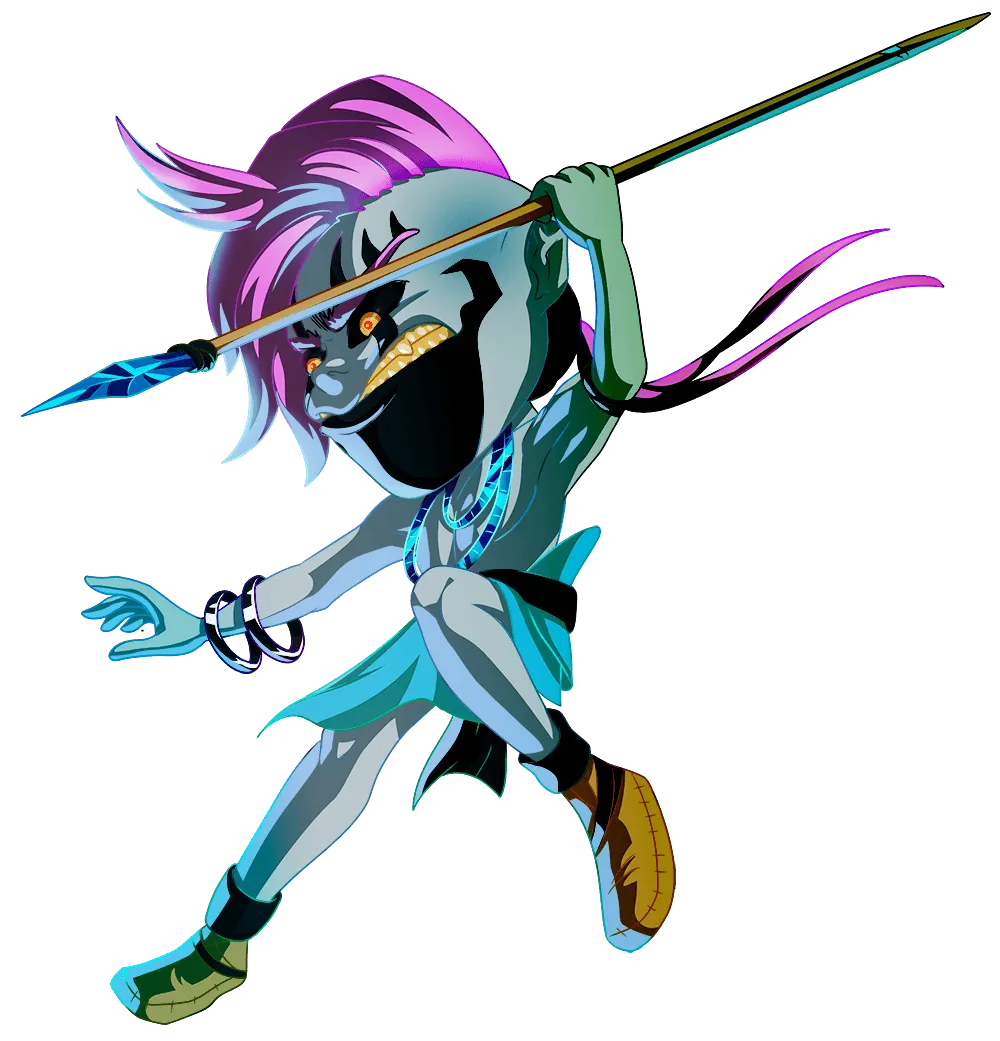
Quiero desearles un feliz fin de semana mi querida comunidad, y junto a ustedes compartirles una de mis participaciones en Splinterlands, siendo hoy mi entrada al concurso de arte de esta semana. Y quiero participar con una presentación de la carta de MITICA HEADHUNTER, esta es una nueva carta para presentar en un estilo retrato, dándole un aspecto femenino a mi participación. Me pareció muy ideal para esta época de Halloween. Me gusto trabajar en esta representación porque pude usar otro tipo de pinceles y enfocarme más en agregar más detalles. Espero les guste deseando que me acompañan en este proceso.
I want to wish you a happy weekend my dear community, and together with you share one of my participations in Splinterlands, today being my entry to this week's art contest. And I want to participate with a presentation of the MITICA HEADHUNTER card, this is a new card to present in a portrait style, giving a feminine aspect to my participation. I thought it was very ideal for this Halloween season. I liked working on this representation because I was able to use other types of brushes and focus more on adding more details. I hope you like it and I hope you join me in this process.
Link de la Imagen de Referencia/Reference Image Link
Etapas del Dibujo/Drawing Stages
Tome para realizar el boceto la brocha tipo pelo por su fluidez en el trazo, luego en una nueva capa empecé a color el color base cambiando el color del fondo ya que trabajaría con blanco como base. Después empece a pincelar con la brocha tipo plano real usando método normal de mezcla, usando tonos fríos y calidos para ubicar la iluminación que quería. Fui aplicando el difumino para mezclar y suavizar y luego fui definiendo un poco más algunas sombras y líneas, seguí trabajando con el difumino. Teniendo ya tonos más definidos con iluminación y sombras fui borrando lo sobresaliente y pase a borrar el delineado . En otra capa fui trabajando las franjas negras usando el pincel tipo plano real.
I took the hair-type brush to make the sketch because of its fluidity in the stroke, then in a new layer I began to color the base color, changing the color of the background since I would work with white as a base. Then I started brushing with the real flat type brush using the normal blending method, using cold and warm tones to locate the lighting I wanted. I applied the blend to mix and soften and then I defined some shadows and lines a little more, I continued working with the blend. Having already more defined tones with lighting and shadows, I erased the highlights and went on to erase the outline. On another layer I worked the black stripes using the real flat brush.
 |  |
 |  |
 |  |
Pase a dibujar los ojos en otra capa y la boca, usando el mismo método normal de mezcla. Fui definiendo un poco más y aplicando más iluminación para definir, luego seguí con el cabello usando un pincel plano real abanico y agregando mechones claros en una capa y en otra mechones las oscuros para crear la profundidad y el volumen. Trabaje en otra capa con el mismo pincel agregando un tono más oscuros para darle profundidad y seguí en una nueva capa agregando pinceladas con el pincel rendondo.
Move on to drawing the eyes on another layer and the mouth, using the same normal blending method. I defined a little more and applied more lighting to define, then I continued with the hair using a real flat fan brush and adding light strands in one layer and dark strands in another to create depth and volume. I worked on another layer with the same brush adding a darker tone to give it depth and continued on a new layer adding brush strokes with the round brush.
 |  |
 |  |
 |  |
Seguí en una nueva capa agregando mechones con añadir para definir un poco más, y aplique una nueva capa de superposición para darle un poco de profundidad en las sombras y también reforzar un poco la iluminación. Así también resalte sus ojos usando una opacidad muy baja. Pase a cambiar el tono de fondo más oscuro y usando la brocha tipo cera agregué los tonos de fondo, finalizando con el pincel tipo purpurina y el punto de brillo usando una capa en añadir, para darle ese toque realista a este personaje. Espero les haya gustado esta nueva presentación de esta semana!🙂👋💕🌹
I continued on a new layer adding strands with add to define a little more, and applied a new overlay layer to give it a little depth in the shadows and also boost the lighting a little. Also highlight your eyes using a very low opacity. I went on to change the darker background tone and using the wax brush I added the background tones, finishing with the glitter brush and the shine point using an add layer, to give that realistic touch to this character. I hope you liked this new presentation this week!🙂👋💕🌹
 |  |
ILUSTRACIÓN FINAL/ End Illustration
Redes Sociales/ Social Networks
Sigueme en/ Follow me in:
👉Instagram: @catrynart
👉 Twitter: @catrynart
Herramientas Usadas/Used Tools
- Tablet Android/ Android Tablet
- Programa Ibis Paint X/ Ibis Paint X Program
- Traductor Deepl/ Deelp Translator
- Servidor de Imagenes Imgbb/ Imgbb Image Server
- Dactilopintura Digital/ Digital Fingerprint Painting
🌺¡HASTA UN PRÓXIMO POST!/ UNTIL A NEXT POST!🌺
Detenerse es Retroceder
To Stop is to go Backwards