

Hello hello I am happy to write you one more time, today I bring the tutorial of model 3 of the 5 different ways to perform hamsa hand according to my perspective, this is the one I like the most, I hope you like all of you with these tutorials try ignite that creative flame that we all have, that this is just a link to get your creativity and give you that personal touch that is you. good I bring you the hamsa hand at the request of @tesmoforia wish you fill with ideas to make them you too ... this is a little more elaborate I still have 2 that I will do little by little you will see the difference in the post that will follow this .
I hope you understand my English, with special love to @viking-ventures
The Hamsa or hand of Fatima is a symbol commonly associated to protect against evil, even in some societies this is related to power, fortune, blessings, to protect oneself from the evil eye, jealousy and rage. Its real origin still remains a mystery, however, there are many legends, of which the most accepted has been the Muslim.
For example, in the Arab countries they call it "Hamsa", eye of Fatima, hand of Fatima, hand of Hamsa, Jemisa and Khamsa, in India it is known as "Humsa", the Jews call it "Hand of Miriam" in reference to the sister of Moses and Aaron, to the Shiites the five persons of the mantle (Muhammad, Fatima, Ali, Hasan and Husayn) and the Hindus call it "Abhaya"
In the Hebrew and Muslim religions it represents the fifth letter of the Hebrew alphabet "Heh" and the five books of the Torah, that is, the first five books of the Bible, Genesis: the beginning, Exodus: names, Leviticus: and called, Numbers: in the desert and Deuteronomy: words, things, and laws.
Let's start:
MATERIALS:
Soutache thread or Rayon braid varies the name according to its Country
Scissors
Liquid silicone
Lighter
2 cm eye sticker
4 mm rhinestones
Thick or semi-leather fabric for the base
Fine tip eyebrow tweezers
Rings or ring of jewelry
1 pin of jewelry
1 Crystal or Rhinestones of your choice.


STEP 1: Cut a piece of leather or thick fabric 10 cm high by 7 cm wide, at the bottom approximately 2 cm from one side and 1.5 cm upwards, measuring from below, we will place liquid silicon on the leather, proceed to cut 3 threads of 8 cm each stick them on the leather as I show in the first image leaving a small hole or half circle on the tip to place a strass at the end, replace silicon liquid next to the threads that we just paste, cut 3 threads of 9.5 cm each and paste them in half as shown in the images, then repeat what we did with the first threads to form the 3 fingers, always the middle finger is longer. When having the 3 fingers that we formed with the threads in the upper part, cut the leftovers I have marked it with a blue line in the image, then burn the ends so that the threads do not fray in the process.

STEP 2: I got some stickers that look like eyes, excellent for this job I was doing ... Just above the threads that we pasted in the previous step, place liquid silicone and place the sticker, they bring a paste even though I prefer to put liquid silicon to reinforce it and Do not let go with the use. Cut 3 threads of approximately 12 cm long each, smear liquid silicone around the sticker and carefully glue the threads, with the help of the eyebrow tweezers, on the bottom to fix them that are well stuck.
STEP 3: Carefully bend each point inwards as shown in image 3 and in the part that I marked with a blue line cut and burn the tip with the help of the lighter, anoint again silicon liquid and with the clamp we will stick the tips on the bottom of the threads so you do not see the tips that will give a better finish as I show with the blue arrow of the last image.

STEP 4: Around the threads that we have just pasted on the top we are going to spread liquid silicon and we will stick the strass 16 stones or approximately 9 cm.
STEP 5: This time we will place liquid silicone on top of the strass that we stick in the previous step and cut 2 threads of approximately 12 cm long each one, we will fold it in each point just below the circles that we made when starting as I show you in the images, I e marked with a black line where you should cut and burn the tips then with the help of the eyebrow tweezer we will stick it down the bottom so they do not look and have a better finish, then we will cut 3 threads 2 cm each and stick just above this circle that we just formed to make the fingers look thicker. We cut the leftover leather and passed the flame of the lighter all over the shore to seal the threads
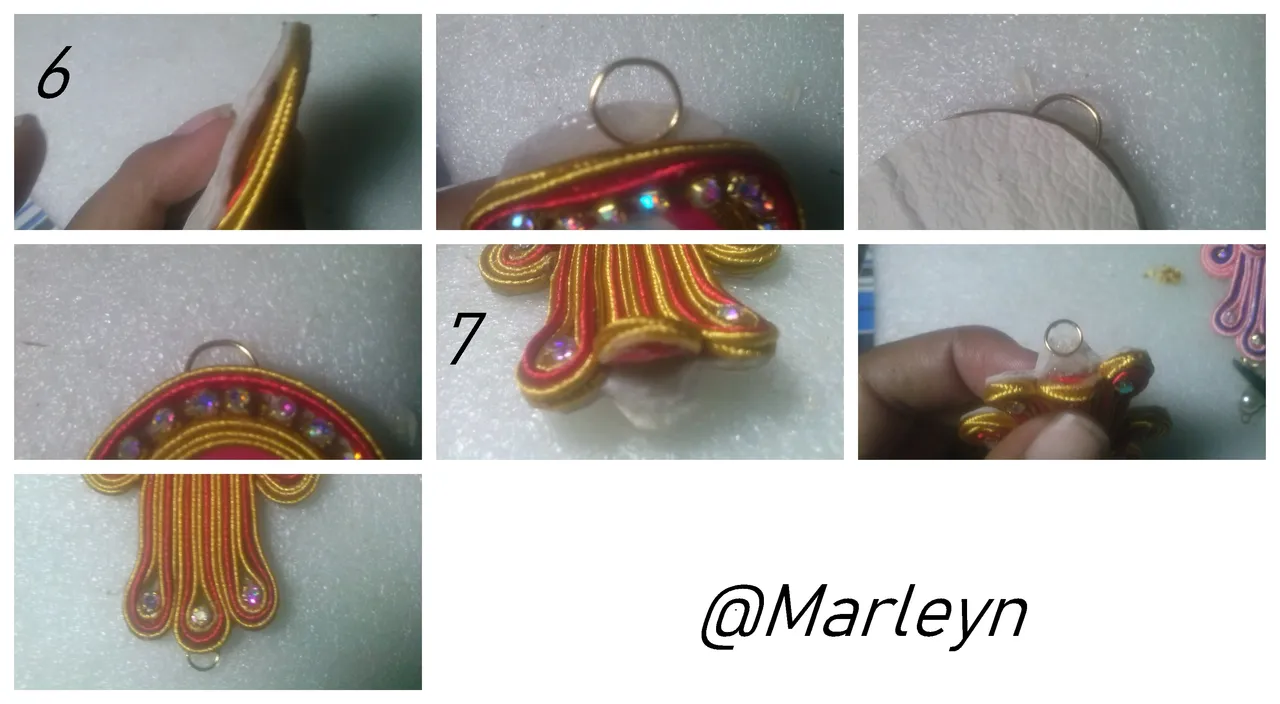
STEP 6: In the upper part take off a little bit the threads, with great care we will place liquid silicon and we will stick a 1 cm wide hoop or ring, reattach it with a lot of care exerting a little pressure.
STEP 7: In the lower part of the long finger, that is, the middle finger performs the same process, only we will use a smaller ring of approximately 0.5 cm.

STEP 8: With a pin of costume jewelery we are going to present a small crystal of 8 cm. Insert the crystal into the pin and with the help of a round-tipped jewelery clip, slowly begin to screw the pin until it reaches the end, with the help of the tweezers, open a ring or ring of about 2 mm, insert the ring into the ring. crystal and at the same time introduce the ring that we stick on the finger hamsa closes it again and it will be as I show you in the last image, now in the top part you just need to put a beautiful necklace, I decided to knit one with the same threads of soutache I hope soon publish the post to teach you this beautiful fabric. So we have finished I really hope you like it and you dare to try it.
