
*****Versión en Español*****
(Below is the English version)
Hace aproximadamente dos semanas hice mi primera publicación en esta comunidad. Presenté la figura de un anciano leyendo, la cual era la representación de un cuadro teatral hecho por @paolasatenea.
Puedes leer esa publicación siguiendo este enlace:
@gaboamc2393/sculpture-2-oldman-reading-escultura-senor-leyendo
Como comenté en aquella publicación, esa sería la primera figura de las dos que haría como representación de este cuadro teatral. En esta publicación, les presento la segunda, el compañero de viaje.

Los materiales que utilicé fueron los siguientes:
- Plastilina.
- Palillos de madera.
- Alambre.
No ocupé papel de aluminio ni paletas para hacer otro banquillo para nuestro compañero de viaje, ya que usé el mismo de la figura anterior:

Esta vez solo me ocuparía de moldear la figura del acompañante del señor que se aprecia en la imagen anterior. Dicho todo esto, ¡Comencemos!
Como es acostumbre en mis figuras, comencé por la base, que en este caso son las piernas. Lo primero que hice fue estirar un trozo de plastilina negra para darle forma tubular (1), luego la doblé para darle forma a los pantalones (2).

Para los tobillos usé un par de palillos que luego cubrí con plastilina gris justo en la mitad. Para los zapatos usé plastilina marrón y otro color un poco más oscuro para la suela de los zapatos (3).

Como se aprecia en la imagen de arriba, clavé la punta de los palillos en la apertura de los zapatos, para que estos quedasen fijos (4), luego fijé cada zapato/tobillo en los pantalones (5).
Tras terminar toda la parte de abajo, procedí a darle forma a la entrepierna de la figura, para luego sentarla en el banquillo:

Lo siguiente sería el torso. Para ello ocupé plastilina azul, la cual moldeé hasta darle forma de cilindro (7). La intención era la de hacer una camisa, así que aplasté un poco la parte de abajo del cilindro y en la parte superior hice un corte con forma de triángulo (8).

Corté otro triángulo de plastilina (9) y lo coloqué en la apertura que había hecho el torso de la figura (10). Lo siguiente fue hacer el cuello de la camisa y otros detalles (11).

De esta manera quedó el torso de la figura con gran parte de sus detalles. Lo siguiente serían los brazos...

Para hacer cada brazo usé dos trocitos de plastilina, los cuales estiré hasta darle forma tubular, luego los doblé un poco (13). Con una aguja hice las arrugas en las articulaciones y las mangas de la camisa (14).

Finalmente fijé cada brazo en su lugar con ayuda de alambres suaves (15). Sirven alambres de cobre o aluminio, en mi caso usé de aluminio.

Para terminar con la parte media de la figura, moldeé las manos con una aguja y las fijé en su lugar con palillos (16). Pero falta algo... ¡Ah sí, la cabeza!
Lo que hice en este caso fue moldear la plastilina alrededor de un palillo hasta lograr la forma deseada, luego hice agujeros para los ojos (17).

Me imaginé a este compañero de viaje como alguien de nariz prominente, así que lo hice tal como lo imaginé (18), luego le hice la boca con ayuda de una aguja (19).

Tras moldear otros detalles, coloqué dos pequeñas esferas de plastilina blanca en los agujeros para los ojos (21) y cubrí con plastilina rosa cada ojo para simular los párpados, luego coloqué las cejas (22 y 23).

Si el señor de la publicación anterior tenía bigote, este no sería menos, así que también le puse un bigote que estuviese a la altura de su nariz, también terminé los ojos (24). Finalmente le coloqué cabello a la figura, bastante para que hiciese contraste con la figura del señor leyendo (25).
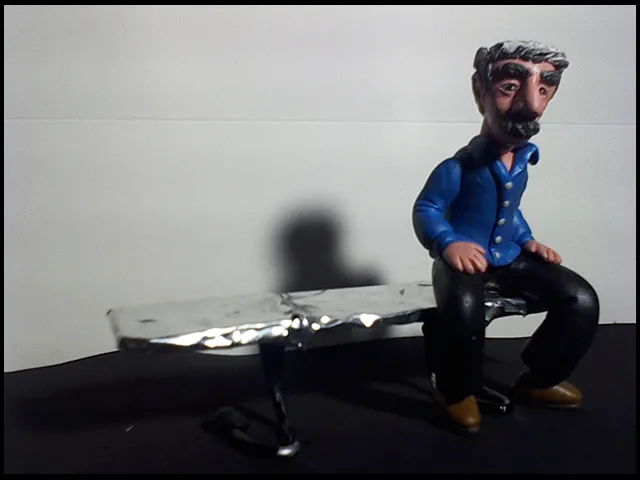
Lo último sería fijar la cabeza de la figura en el torso y ya. La figura quedó terminada y el resultado me gustó.

Les dejo fotos de nuestro acompañante de viaje desde distintos ángulos.


Como dije al comienzo de la publicación, esta sería la segunda de dos figuras; es decir, el complemento de un diorama que representa a dos señores viajando en el metro. Mis dos figuras están listas, así que les presento a nuestros dos actores, el señor leyendo y a su compañero de viaje:


¿Qué les ha parecido? A mi me encantó hacer ambas figuras, disfruté mucho moldeando las figuras hasta lograr la apariencia que imaginé que tendría cada actor del cuatro teatral "Obituario".
Pueden leerlo siguiendo este enlace:
@paolasatenea/esp-obituario
Yo espero que la publicación les haya gustado y hayan disfrutado leyéndola tanto como yo disfruté haciéndola. Nuevamente gracias a la comunidad de HiveDIY por el buen recibimiento y a @paolasatenea por permitirme hacer este par de figuras inspiradas en su publicación. Sin más que agregar, me despido entonces...
¡Hasta la próxima!
*****English version*****
(Arriba está la versión en español)
About two weeks ago I made my first publication in this community. I presented the figure of an old man reading, which was the representation of a theatrical painting made by @paolasatenea.
You can read that publication by following this link:
@gaboamc2393/sculpture-2-oldman-reading-escultura-senor-leyendo
As I mentioned in that publication, this would be the first of the two figures that I would make as a representation of this theatrical painting. In this publication, I present the second one, the traveling companion.
The materials I used were the following:
- Plasticine.
- Wooden sticks.
- Wire.
I did not use aluminum foil or pallets to make another stool for our traveling companion, as I used the same one as in the previous figure:
This time I would only take care of molding the figure of the man's companion that can be seen in the previous image. Having said all this, let's begin!
As usual in my figures, I started with the base, which in this case are the legs. The first thing I did was to stretch a piece of black plasticine to give it a tubular shape (1), then I folded it to give shape to the pants (2).
For the ankles I used a pair of sticks that I then covered with gray clay just in the middle. For the shoes I used brown plasticine and another slightly darker color for the soles of the shoes (3).
As you can see in the image above, I stuck the tip of the toothpicks into the opening of the shoes, so that they would be fixed (4), then I fixed each shoe/ankle to the pants (5).
After finishing all the bottom part, I proceeded to shape the crotch of the figure, to then sit it on the stool:
Next would be the torso. For this I used blue plasticine, which I molded into a cylinder shape (7). The intention was to make a shirt, so I flattened a little the bottom of the cylinder and at the top I made a triangle-shaped cut (8).
I cut another plasticine triangle (9) and placed it in the opening made by the torso of the figure (10). Next I made the collar of the shirt and other details (11).
This way the torso of the figure was left with most of its details. Next would be the arms...
To make each arm I used two small pieces of plasticine, which I stretched into a tubular shape, then bent them a little (13). With a needle I made the wrinkles in the joints and the sleeves of the shirt (14).
Finally I fixed each arm in place with the help of soft wires (15). Copper or aluminum wires are suitable, in my case I used aluminum.
To finish with the middle part of the figure, I molded the hands with a needle and fixed them in place with toothpicks (16). But something is missing... Ah yes, the head!
What I did in this case was to mold the plasticine around a toothpick until the desired shape was achieved, then I made holes for the eyes (17).
I imagined this fellow traveler as someone with a prominent nose, so I made him just as I imagined him (18), then made his mouth with the help of a needle (19).
After molding other details, I placed two small spheres of white plasticine in the holes for the eyes (21) and covered each eye with pink plasticine to simulate the eyelids, then placed the eyebrows (22 and 23).
If the gentleman of the previous publication had a mustache, this one would not be less, so I also put a mustache that was at the height of his nose, I also finished the eyes (24). Finally I put hair to the figure, enough to make contrast with the figure of Mr. reading (25).
The last thing would be to fix the head of the figure on the torso and that's it. The figure was finished and I liked the result.
Here are some photos of our travel companion from different angles.
As I said at the beginning of the publication, this would be the second of two figures; that is, the complement of a diorama representing two gentlemen traveling in the subway. My two figures are ready, so I present to you our two actors, oldman reading and his travel companion:
What did you think? I loved making both figures, I really enjoyed molding the figures until I achieved the appearance that I imagined each actor of the theatrical four "Obituary" would have.
You can read it by following this link:
@paolasatenea/esp-obituario
I hope you liked the publication and enjoyed reading it as much as I enjoyed making it. Thanks again to the HiveDIY community for the good reception and to @paolasatenea for allowing me to make this pair of figures inspired by her post. With nothing more to add, I say goodbye then....
See you next time!

Imagenes editadas con Photoshop
Fotos tomadas con tablet HP stream 7
Traducido con DeepL
Photos edited with Photoshop
Photos taken with HP stream 7 tablet
Translated with DeepL
Últimos tres post/Last three posts:
Weekend in my vegetable garden, one month later!
Entrada al Concurso de microrrelatos fantásticos de Literatos | Canicas
El naufragio del Irasema (Parte Final)