
You can make this

What you need to make this.
1: 100% Cotton shirt: This is important you can get some very mixed results with blends (preferably the right colour unlike this tutorial)
2: Bleach.
3: Reynolds Freezer Paper(works best) or contact paper (you know that plastic crap your parents used to cover your books with)
4: Pencil or Pen
5: Spray Bottle.
6: X-acto (Razor) Knife.
8: Mask and Gloves if you don't want to get bleach on you hands and in your lungs.
9: Almost forgot Paper Towel.
How to make this.
Step one.
Print out your design and copy it to your freezer paper or contact paper and cut out stencil as you can see I have chosen the world famous Steemit logo for the demonstration purposes however if your one of those creative types feel free to go freehand.
Important note if working with Reynolds Freezer Paper copy your design with the plastic sheen side down otherwise you will end up with an inverted image at the end.

Step two
Cut out your stencil using the razor knife.
Don't waste time trying to make it perfect this whole process does not lend itself well to perfect, crisp lines in fact that's part of its charm. No two shirts you make this way will be the same.
Step three
Applying your stencil to your shirt, this is why we use Rogers if we have access to it.
Put some baking paper or some cardboard inside the shirt this will prevent bleaching the back of the shirt.
Position your stencil where you want it plastic sheen side down and iron in place that plastic coating will stick to the shirt.

Warning DO NOT apply iron to plastic contact paper you will wreck your stencil and iron
Step Four
Mixing the bleach. Don't wear your favourite pants.
For the best and safest results mix your bleach 50/50 with water in a water spray bottle higher concentrations can damage the material trust me I know one of my favourite shirts now has premature holes where I went a little over board with my bleach mix.

However a straight bleach and a small paint brush can net some pretty cool effects but you have been warned of the risks.
Step five
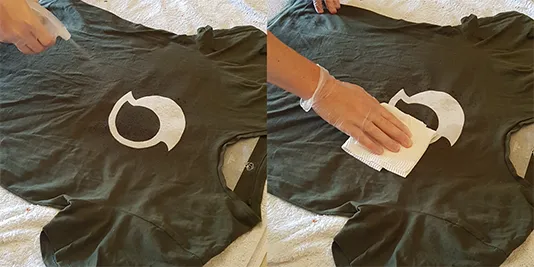
Spray the bleach onto the shirt around the stencil and pat away any excess liquid this stops the bleach from seeping under the stencil and wrecking the lines.
From here Its up to you.
You have a choice you can be patient, chill out and let the bleach do its work go away for 5- 10 mins and come back and see how the bleach has developed and decide whether to add more. In my experience this tends to give more even/muted tones.
Or
If you're like me you can crack out an iron and apply heat to the bleach, that toasty little heat giver will enhance the bleaching process and adds to the contrast and in my opinion the fun.

** Warning Heat + Bleach/water = Steam. DON'T BREATH hence the suggestion of a mask **
Step six
So your happy with your shirt? Good, peel up that stencil its time to drench that sucker fill a sink, a bucket, the bath or swimming pool with cold water and submerge your shirt and agitate the heck out of that thing, give it a real good shake around.

This is important that cold water stops the bleaching process and helps remove excess bleach from your shirt.
Wring your shirt out and hang it up to dry.
Step seven
So shirt, Much Awesome, Very your call.
If it doesn't smell like bleach and you're keen chuck it on.
If it smells like bleach and you want to save the planet give it another hand wash.
If it smells like beach but think the planet is just fine wash separately from other items but be a little responsible and put it on a lite load.
Things I have made like this.


If you would like to know who I am click HERE or follow me @shai-hulud
If you feel like being inspired by and amazing woman click HERE or follow her @insideoutlet
Kind Regards
Peter